
Tools

Chicken jalapeño and cheddar sausage
This is a great sausage for anyone who loves the taste and heat of fresh Jalapeño peppers. The cheddar cheese adds a creamy tanginess that makes it a backyard BBQ crowd pleaser. Serve on toasted buns with honey mustard, fresh diced tomatoes, cilantro and more cheddar cheese.
Tools
Ingredients
900 g boneless skinless chicken thighs, cut into 2.5-cm strips
45 g jalapeño peppers, halved, seeded and cut into 2.5-cm strips
50 g cheddar cheese, grated
3 cloves garlic
1 tbsp powdered garlic
1 tbsp powdered onion
1 tbsp kosher salt
1 tsp black pepper
1 5 feet large sausage casing, rinsed and soaked in cold water for 30 minutes
Step by step
Place the chicken on a parchment lined baking sheet and freeze for 20 minutes before proceeding. Then season the chicken in a large bowl with the salt, pepper, powdered garlic and onion, whole garlic cloves, cheddar and jalapeño peppers.
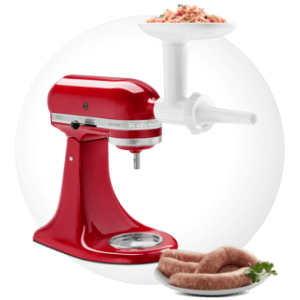
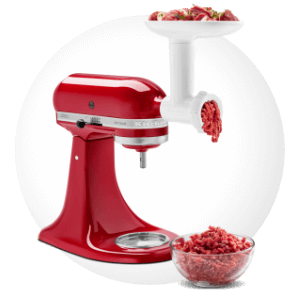
Attach your Food Grinder attachment fitted with the fine grinding plate to your Stand Mixer. Place the bowl under the grinder, turn the mixer to speed 4 and use the food pusher to feed the seasoned chicken, jalapeño peppers, and garlic cloves through the grinder one to two pieces at a time. Do not use the food pusher to force it through. Remove the bowl from under the grinder and use your hands or a spatula to combine the ingredients thoroughly. Keep cold.
Attach the Sausage Stuffer Attachment fitted with the large stuffing tube to the mixer. Grease sausage tube with a little olive oil or water, and slide casings on tightly. Set a sheet pan with a little water under the sausage stuffer for the sausage to lay in as they are being stuffed. Keep your hands wet with water as you work with the casings. Tie off the end and pierce it with a knife tip or kitchen pick with a tip the size of a small nailhead.
Turn the mixer to speed 4 and slowly feed the the sausage mixture into the hopper using the food pusher. Hold tied end of casing in one hand and guide the sausage mixture as it fills up. Do not pack too tightly into the casing, and try to avoid slack. Once all of the filling has been used, remove the casing from the sausage stuffer giving yourself enough length to tie the end as close to the filling as possible. Coil the entire length of sausage on the pan, then pinch to separate the filling every 15-cm. Twist every other link about six times. Set on a pan in the refrigerator, still connected, overnight before separating.
To cook the sausage: Heat a large skillet or cast iron pan over medium high heat, add 1 tablespoon of olive oil and brown the sausages on all sides. Reduce heat to low and cook for 10-15 minutes until cooked through.
Tip: If you run into air bubbles while stuffing the sausage, use a toothpick to poke a hole in the casing at that spot. Handmade fresh sausages are always better the next day. If you can, let them rest unseparated in the refrigerator overnight.